The first time I made The ultimate caramel apple pie recipe, it was a disaster of epic proportions. I’d envisioned a glistening, molten core of pure, buttery caramel embracing tender, spiced apples, all cradled in a flaky, golden crust. What I got was a syrupy, sugary swamp, apples like bruised sponges, and a crust that had the texture of damp cardboard. It was the kind of pie that makes you question your life choices. That disastrous debut led me down a rabbit hole of experimentation, and it wasn’t until I truly understood the magic of controlled sugar crystallization that my caramel apple pies finally became, well, ultimate.
Why Most Versions of The Ultimate Caramel Apple Pie Fail
The overwhelming majority of home cooks, myself included in those early years, try to shortcut the caramel. They dump sugar, butter, and cream into a saucepan and crank up the heat, hoping for the best. This is the “scorched earth” caramel method, and it’s a recipe for disappointment. What you end up with is either an acrid, burnt mess that tastes like despair, or a cloyingly sweet, grainy syrup that never quite thickens. The apples, instead of being infused with a nuanced, deep flavour, are drowned in this one-note sweetness, their delicate texture obliterated. My early pies were a testament to this: a sticky, unctuous goo that oozed out, scalding the bottom crust and rendering the apples mushy. The contrast to a truly great caramel apple pie, with its distinct layers of tender fruit, rich, adaptable caramel, and a crisp, buttery crust, is stark and utterly disheartening.
The Ingredients That Actually Matter
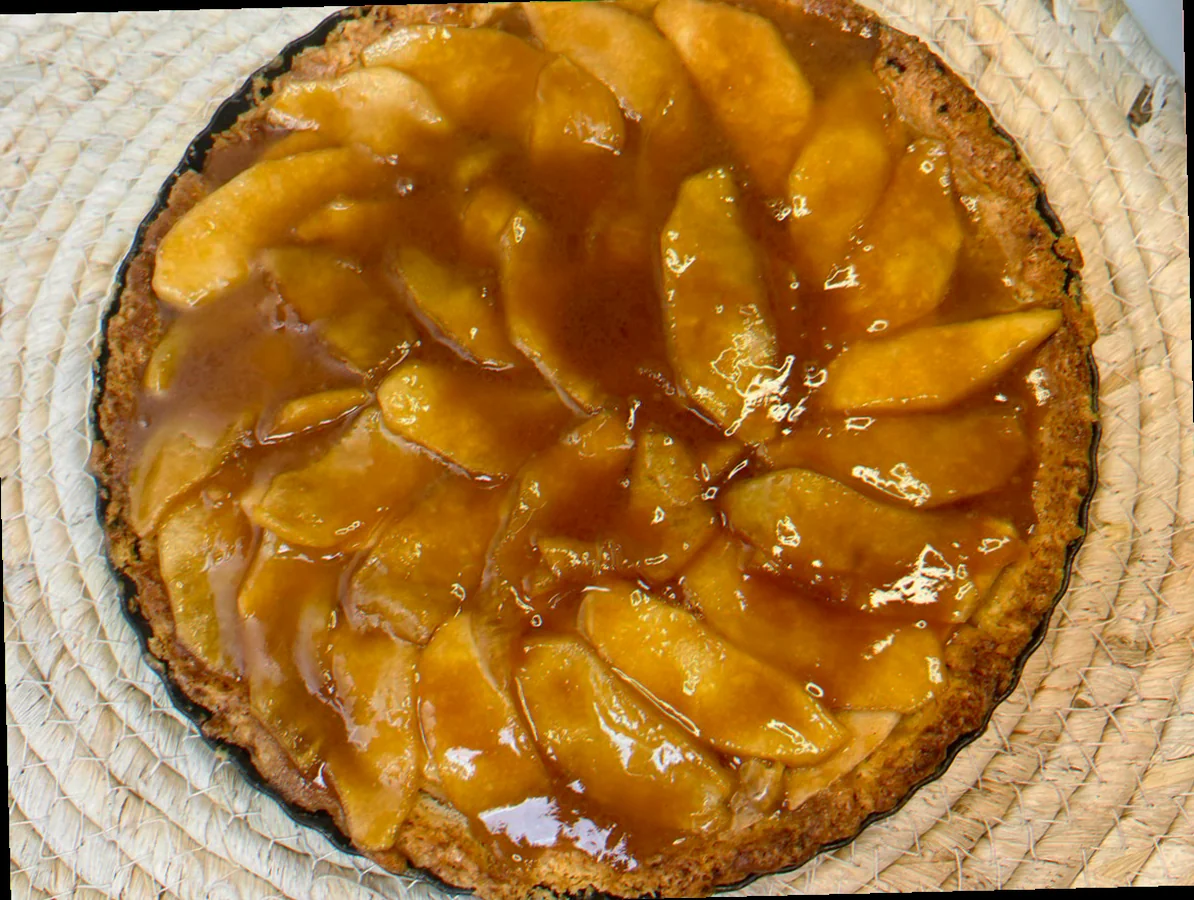
For this pie, the apples are paramount. I’ve tried them all, but I keep coming back to a blend of Honeycrisp and Granny Smith. The Honeycrisp brings a beautiful, honeyed sweetness and a fantastic crunch that holds its shape, while the tartness of the Granny Smith cuts through the richness of the caramel, preventing it from becoming cloying. I use about 1.4 kilograms of apples, peeled, cored, and sliced about 0.5 cm thick. Too thin and they turn to applesauce; too thick and they’ll never cook through.
Then there’s the butter. Oh, the butter. Unsalted, of course, and I always use a good quality European-style butter, with a higher fat content. I melt about 225g of it, and it’s the foundation of that luxurious caramel. For the sugar, it’s crucial to use a mix. I’ll use about 300g of granulated sugar for that caramel base, but I also stir in 50g of packed light brown sugar for a little depth and moisture. And the cream. This is non-negotiable: heavy whipping cream, about 240ml. Anything less and your caramel won’t have that silken, luxurious sheen. A pinch of salt, just a quarter teaspoon, is vital to balance the sweetness. And for the apples themselves, a mere teaspoon of ground cinnamon and a quarter teaspoon of ground nutmeg. Too much and it overpowers the delicate apple and caramel notes.
The Moment Everything Changes: Controlled Sugar Crystallization
The revelation for me, the secret sauce if you will, was understanding controlled sugar crystallization. It sounds scientific, I know, but it’s surprisingly intuitive once you grasp the concept. Most people get sugar crystallization wrong by simply boiling sugar without paying attention to the conditions. They stir too much, introducing air and seed crystals, or they let it boil unevenly, creating hard, grainy patches.
The “right way,” the way that transforms a mediocre pie into the ultimate, is to treat the sugar like a delicate, temperamental friend. You want it to melt slowly, evenly, and without interference. This means creating a simple syrup base first by dissolving the granulated sugar in just enough water to wet it, then cooking that without stirring until it reaches a deep amber hue. This controlled heating prevents the sugar molecules from clumping together in an uncontrolled, gritty fashion. It’s about coaxing the sugar to melt and caramelize beautifully, creating a smooth, homogenous liquid. Once that perfect amber is achieved, the butter and cream are added slowly and gently, creating that luscious, emulsified caramel. Without this mindful approach to sugar, you’re always gambling, and usually losing.
How I Actually Make It Now — Step by Step
This is where the magic truly happens, and it’s about patience and observation.
The Caramel Base: I start by combining 300g granulated sugar and about 60ml of water in a heavy-bottomed saucepan. I never stir this mixture initially. I just swirl the pan gently over medium heat until the sugar is completely dissolved. Then, I increase the heat to medium-high and let it bubble away. This is where you need to watch. I’m looking for the edges of the pan to start turning golden, then the colour to slowly creep inward. It typically takes about 8-10 minutes. The goal is a deep, rich amber, the colour of a polished penny, or slightly darker. If it starts to smoke excessively or turn a dark, blackish-brown, it’s burnt, and you have to start over. The aroma should be nutty and sweet, not acrid.
The Emulsification: Once I hit that perfect amber, I immediately remove the pan from the heat. Very carefully, I whisk in 225g of cubed, cold unsalted butter, one cube at a time. It will bubble up violently, so stand back! Once the butter is mostly incorporated and the foaming subsides, I slowly, in a thin stream, whisk in 240ml of room-temperature heavy whipping cream. I’m whisking constantly here to create a smooth, glossy emulsion. The caramel will look a bit broken at first, but keep whisking and it will come together. Finally, I stir in the 50g of light brown sugar, quarter teaspoon of salt, teaspoon of cinnamon, and quarter teaspoon of nutmeg. I let this cool slightly while I prepare the apples.
The Apple Assembly: I take my sliced apples and gently toss them in a large bowl with the slightly cooled caramel. I want every apple slice to be coated, but not drowning. This is where you can feel the texture of the apples – they should be firm and coated, not mushy.
The Crust and Assembly: I use a pre-made all-butter pie crust for the bottom, ensuring it’s chilled. I gently press it into my 9-inch pie plate. Then, I carefully arrange the caramel-coated apple slices, mounding them slightly in the center. I have a second, lattice-top pie crust ready, which I lay over the apples. I crimp the edges tightly to seal, and cut a few vents in the top crust.
The Bake: This pie bakes at 200°C for the first 15 minutes, to set the crust. Then, I reduce the oven temperature to 180°C and continue baking for another 35-45 minutes, or until the crust is a deep golden brown and you can see the caramel bubbling thickly through the vents. If the edges of the crust start to get too dark, I’ll loosely tent the pie with foil. The key is to listen for the gentle, happy sigh of the caramel bubbling.
The Failures I Still See — and How to Fix Them
- Grainy Caramel: This is the most common culprit and it’s a direct result of uncontrolled sugar crystallization. You stirred too early, or the sugar clumped unevenly. The fix: Start over with a clean pan, and follow the controlled sugar crystallization method. No shortcuts!
- Runny Caramel: You didn’t cook the caramel long enough, or you added too much cream. The sugar syrup never reached the right density. The fix: Sometimes, you can salvage it by returning the pie to a lower oven temperature (around 160°C) for an extra 10-15 minutes. Watch it closely – you want to see the caramel thicken significantly, not just bubble. If it’s still too liquid, well, it becomes an apple crumble with a caramel sauce.
- Soggy Bottom Crust: This is the one that still catches me out sometimes if I’m rushing. It’s often caused by a combination of too much liquid in the filling and not pre-baking the bottom crust enough. The fix: I’ve learned to bake my bottom crust for about 10 minutes at 200°C before adding the filling. This par-baking, or blind baking, creates a barrier that prevents the caramel from seeping through and turning it into a soggy mess.
When I Make This and What I Serve It With
The ultimate caramel apple pie is my go-to for autumn gatherings and holiday celebrations. It’s the star of our Thanksgiving dessert table, and a welcome presence at any fall potluck. It’s the kind of pie that demands to be shared, its warmth and richness mirroring the spirit of the season. I love pairing it with a simple scoop of vanilla bean ice cream, the cold creaminess a beautiful contrast to the warm, gooey caramel. Another favourite is a dollop of lightly sweetened whipped cream, infused with a hint of bourbon. It’s comfort personified.
Substitutions I’ve Tested Honestly
- Honeycrisp Apples → Fuji or Gala: I’ve tried this, and while it works, the texture isn’t quite as firm, and the flavour is a little less complex. Fuji is a decent runner-up for sweetness, but Gala can be a bit too soft. It’s acceptable in a pinch, but not my ideal.
- Heavy Whipping Cream → Evaporated Milk: Absolutely not. I tried this once, hoping for a lighter caramel. It resulted in a thin, watery mess that never properly emulsified. Stick to full-fat cream.
- Vegan Caramel Apple Pie: I’ve experimented with vegan butter and coconut cream. It’s possible to get a decent caramel, but it’s never quite the same richness or silken texture. You also need to be very careful with the vegan butter’s water content. It generally works, but it’s a compromise, and honestly, for this recipe, I wouldn’t recommend it if you’re aiming for ultimate.
Questions I Get Asked About The Ultimate Caramel Apple Pie
My caramel is always grainy! What am I doing wrong?
You’re likely stirring the sugar too much or too early. Let the sugar and water mixture come to a boil undisturbed. Once it starts to colour, swirl the pan gently to ensure even browning, but resist the urge to stir with a spoon. Think of it as coaxing the sugar to melt, not forcing it.
My pie crust always ends up soggy. How do I avoid that?
The par-baking step is your best friend. Blind bake your bottom crust for about 10 minutes at 200°C before you add the filling. It creates a sturdy foundation that can hold up to the luscious caramel.
Related topics: Recipe for bottled apple pie filling · Best tasting apple pie filling recipe · The new yorker apple pie recipe
Why does my caramel leak out everywhere when it bakes?
This usually means your caramel isn’t thick enough, or your crust isn’t sealed well. Ensure your caramel has reached a good, viscous consistency before adding the apples. And when you crimp your edges, really press them together firmly – no gaps allowed!