I spent three years getting the Marguerite Preston pie crust recipe wrong before I understood that the “pea-sized lumps of butter” advice followed by most bakers is a convenient lie. I had produced dozens of crusts that were either crumbly like sand or tough like a discarded boot heel, all while following the instructions to a tee. It wasn’t until I embraced the fraisage—the French technique of smearing the fat into the flour with the heel of your hand—shattering the “chunks of butter” myth, that my kitchen finally produced a crust that actually shattered into a thousand buttery shards upon contact with a fork.
Why Most Versions of This Crust Fail
Most people approach Marguerite Preston’s logic with a food processor in hand, which is the ultimate “wrong way.” When you pulse your fat and flour, you create a uniform, sandy meal that leads to a shortbread-like texture. It’s “tender,” sure, but it’s not flaky. A true Preston-style crust requires lamination, not pulverization. If you use a machine, you lose the distinct sheets of fat that create steam vents in the oven. You end up with a “mealy” crust that tastes fine but lacks the structural integrity to hold up a heavy fruit filling. The result of the “wrong way” is a flat, dense disc that feels greasy rather than light. Real flakiness is a structural achievement, not just an ingredient ratio.
The Ingredients That Actually Matter
I don’t care what the generic brands say; the protein content of your flour is the difference between a flake and a fracture. I use exactly 315g of King Arthur All-Purpose flour because its 11.7% protein provides just enough gluten to hold those layers together without becoming elastic. I’ve tried lower-protein pastry flours, and the crust simply disintegrated into a pile of dust.
Then there is the butter. I’ve wasted money on fancy cultured butters that have too much water, but for this, I stick to 225g of high-fat, European-style unsalted butter—something like Kerrygold. It must be cold—not “fridge cold,” but “freezer-edge cold.” I cut it into 1-cm cubes and put it back in the freezer for ten minutes before I even touch the flour. To season, I whisk in 6g of Diamond Crystal kosher salt and 12g of granulated sugar. The sugar isn’t for sweetness; it’s for the Maillard reaction. Without it, your crust stays a ghostly, anaemic grey. Finally, for the hydration, I prepare 120ml of ice water, but I only use what the dough demands. I always add a teaspoon of apple cider vinegar to that water; the acid inhibits gluten development just enough to give me a margin of error if I get too aggressive with the rolling pin.
The Moment Everything Changes: Fraisage
The revelation that transformed my baking was the fraisage. For years, I was terrified of “overworking” the dough, so I left the butter in large, distinct marbles. The result was a greasy mess where the butter leaked out in the oven. Fraisage is the intentional smearing of those butter cubes against the work surface. By using the heel of your hand to push the fat into long, thin streaks, you are essentially creating internal “plates” of butter. When that dough hits a 220°C oven, the water in those butter-streaks evaporates instantly, puffing the flour layers apart like a bellows. It turns a standard pie crust into a hybrid of a tart shell and a croissant. It is the single most important physical action in the entire process.
How I Actually Make It Now — Step by Step
The Initial Rub: I toss the 225g of frozen butter cubes into the 315g of flour mixture and, using only my fingertips, I flatten each cube into a disk. I’m not rubbing them into crumbs; I’m making “butter coins.” I want to see every single piece of butter coated in flour but still very much a distinct, flat entity.
The Hydration Squeeze: I drizzle about 80ml of the ice-cold vinegar-water over the mixture. I use a silicone spatula to toss it like a salad. I’m looking for a “shaggy mass”—a term that used to confuse me until I realized it means the dough should look like it’s failing to stay together. If I squeeze a handful and it stays in a clump without shattering, I stop adding water. Usually, I end up using about 100ml total, but never the full 120ml.
The Fraisage Smear: I dump the shaggy pile onto a cold marble slab. I take a portion of the dough and, using the heel of my palm, I smear it away from me across the counter in one firm stroke. I repeat this for the whole pile. The dough will look messy and streaky, which is exactly what you want. I use a bench scraper to fold it back onto itself.
The Letter Fold: This is where I steal a move from puff pastry. I pat the dough into a rough rectangle and fold it in thirds like a letter. This creates instant layers. I wrap it tightly in plastic and let it rest in the fridge for at least two hours. If you skip this rest, the gluten will be “angry,” and the crust will shrink into a puddle in the oven.
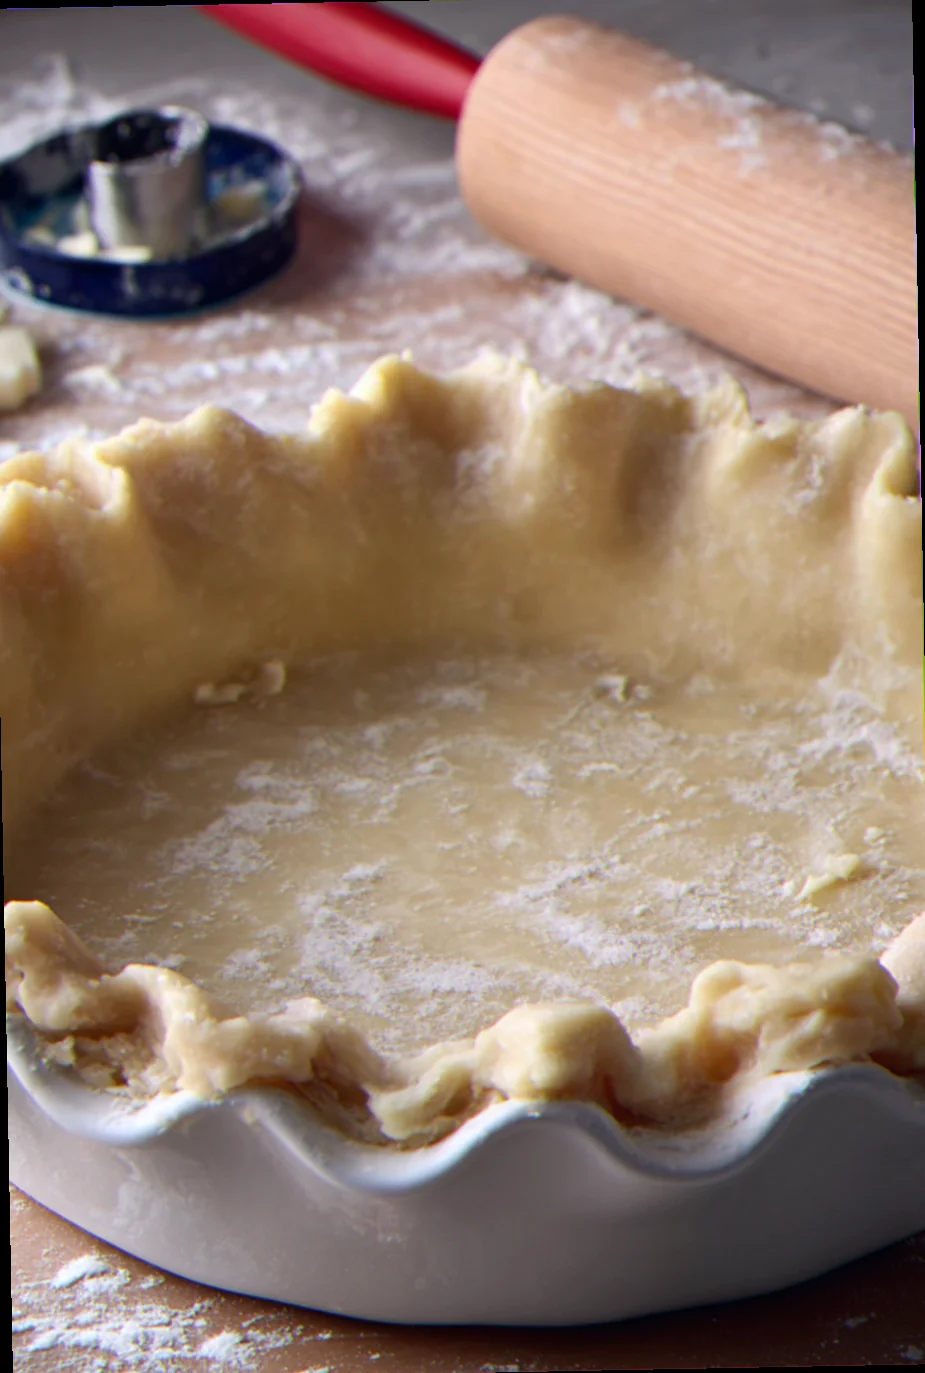
The Cold Roll: I roll the dough out only when it’s chilled through, aiming for a 3mm thickness. I listen for the “thwack” of the rolling pin; if the dough feels soft or sticky, it goes back in the fridge for fifteen minutes. I drape it over the tin, trim the edges to a 2cm overhang, and tuck them under for a thick, crimped border.
The Failures I Still See — and How to Fix Them
- The Shrinking Violet Syndrome: If your crust pulls away from the edges and shrivels, you didn’t let the gluten relax. The fix is a double-rest: two hours after mixing, and another thirty minutes in the freezer after you’ve crimped it into the pan but before it hits the heat.
- The Grey, Soggy Bottom: This is caused by low initial heat or wet fillings. You must start the bake at 220°C to “set” the crust before dropping the temp to 190°C. Also, paint the bottom of the raw crust with a thin layer of beaten egg white to create a moisture barrier.
- The Crumbly Disaster: If the dough cracks and falls apart while rolling, it’s too cold or too dry. I recover this by letting it sit at room temperature for five minutes and then using the heat of my hands to “patch” the cracks. It won’t be perfect, but it saves the bake.
When I Make This and What I Serve It With
This crust is my “prestige” move for Thanksgiving, but it earns its keep any time I’m making a high-moisture fruit pie where a store-bought crust would dissolve into mush. I specifically make this for a Salted Caramel Apple Pie—the acidity of the Granny Smiths cuts through the high butter content of the crust perfectly. On the savory side, it is the only vehicle worthy of a Chicken and Leek Pot Pie. The richness of the leeks and cream demands a crust that can stand up and fight back. To drink, I always serve a very dry, crisp Hard Cider; the carbonation and malic acid scrub the palate clean of the butter, making every bite of crust feel like the first one.
Substitutions I’ve Tested Honestly
- Unsalted Butter → Salted Butter: I tried this once when I was desperate. It’s fine, but you have to omit the added salt entirely. However, salted butter often has a higher water content, which made my layers slightly less distinct. It’s an “emergency-only” swap.
- Apple Cider Vinegar → Vodka: This is a popular hack because alcohol doesn’t promote gluten. It works, and the crust is very tender, but you lose the subtle tang that the vinegar provides. I prefer the flavor profile of the vinegar.
- Butter → Lard/Shortening: I tested a 50/50 split. The flakiness was off the charts, but the flavor was dull. Marguerite’s recipe lives and dies by the flavor of the butter, so I stick to 100% dairy.
Questions I Get Asked About This Crust
Can I make the dough in advance?
Yes, and you should. It stays perfectly in the fridge for 3 days or the freezer for 3 months. In fact, a 24-hour rest in the fridge makes the dough much easier to roll out because the moisture has time to distribute perfectly through the flour.
Related topics: Recipe to make apple pie crust · Pecan sour cream pie crust recipe · Adeena sussman pie crust recipe
Why is my dough “marbled” with yellow streaks?
That is actually a sign of success! Those yellow streaks are the smeared butter from your fraisage. When you see those, you know you’re going to have a flaky, laminated result. Don’t try to mix them away until the dough is a uniform color, or you’ll end up with a tough crust.
Do I really need to weigh the ingredients?
If you use a measuring cup for the flour, you are gambling with your afternoon. Depending on how packed the flour is, a “cup” can vary by 30 grams. In pie crust, 30 grams of extra flour is the difference between a flaky masterpiece and a dry, cracked mess. Buy a scale.