I spent three years getting cookie crumb pie crusts wrong before I understood that I wasn’t just making a base; I was conducting a structural engineering project using sugar and fat. The first time I tried to serve a Key Lime pie to my in-laws, the crust didn’t just crumble—it disintegrated into a greasy, sandy slurry the moment the knife touched it. I realized then that the “wet sand” texture everyone talks about is a lie, or at least a dangerous oversimplification. The revelation that changed everything for me was the Cold-Compression Anchor. It’s the realization that the physics of the crust depends entirely on the mechanical force applied during the shaping stage, paired with a specific thermal shock, rather than just the amount of butter you throw at the crumbs.
Why Most Versions of Cookie Crumb Pie Crust Fail
The “Eyeball and Press” method is the enemy of a good dessert. Most people take a sleeve of crackers, smash them into uneven shards, douse them in melted butter until they look damp, and then poke at them with their fingers until the pan is covered. This is the “wrong way” because it creates a crust with no structural integrity. You end up with the “Butter Pool” effect—where the fat separates during baking and fries the bottom of the crust into a literal rock, while the sides remain a loose, dusty mess. A proper crust should have a “snap-then-melt” profile. It should be firm enough to hold its shape when lifted on a fork, but shatter into buttery, toasted crystals the second it hits your tongue. If your crust feels like damp cardboard or a tooth-breaking tile, you’ve failed the emulsion.
The Ingredients That Actually Matter
I don’t use “just any” cookie. I’ve found that 250g of high-density speculoos or honey graham crackers provides the best tectonic foundation. I once tried using digestive biscuits, but they lack the structural sugar-binding needed for a clean slice. The hero, however, is the butter. I refuse to use plain melted butter anymore. I use 85g of unsalted butter that I have specifically browned until it reaches a deep amber hue. This removes the water content—which usually makes crusts soggy—and replaces it with toasted milk solids that act like a flavor-amplifier.
To this, I add 40g of granulated sugar, but only if the cookies aren’t overly sweet. If I’m using Oreos, I skip the extra sugar entirely because the filling is already a stabilizer. The secret ingredient I will fight anyone over is 3g of fine sea salt. Without it, the crust is just a sugary wall; with it, the entire pie is elevated. Finally, I’ve started adding 15g of almond flour to my crumb mix. It acts as a “filler” for the microscopic gaps between the larger cookie crumbs, creating a much tighter, more professional weave.
The Moment Everything Changes: The Cold-Compression Anchor
The single technique that transformed my baking is the Cold-Compression Anchor. For years, I thought pressing the crumbs in with my fingers was enough. It isn’t. Your fingers are warm, soft, and uneven. To get a crust that behaves like a professional pastry, you must use a flat-bottomed, straight-sided measuring cup or a heavy glass. You are not “patting” the crumbs; you are forging them. By applying significant downward pressure, you force the sugar in the crumbs and the fats in the butter to interlock into a singular, solid sheet. Then—and this is the “anchor” part—you must chill that compressed disc for exactly 20 minutes before it hits the oven. This sets the fat in its compressed state, ensuring that when it hits the 175°C heat, the crust “sears” into place rather than slumping down the sides of the tin.
How I Actually Make It Now — Step by Step
I start by pulverizing my 250g of cookies. I don’t want dust—dust makes a paste. I want the texture of coarse cornmeal with a few tiny, sand-sized grits for character.
The Infusion: I pour my 85g of hot, browned butter over the crumbs and salt. I use a silicone spatula to fold it in. What I’m looking for here is a uniform color change. If there are light patches, the crust will fail. I smell the toasted butter mixing with the cinnamon of the crackers; it should smell like a bakery, not just oil.
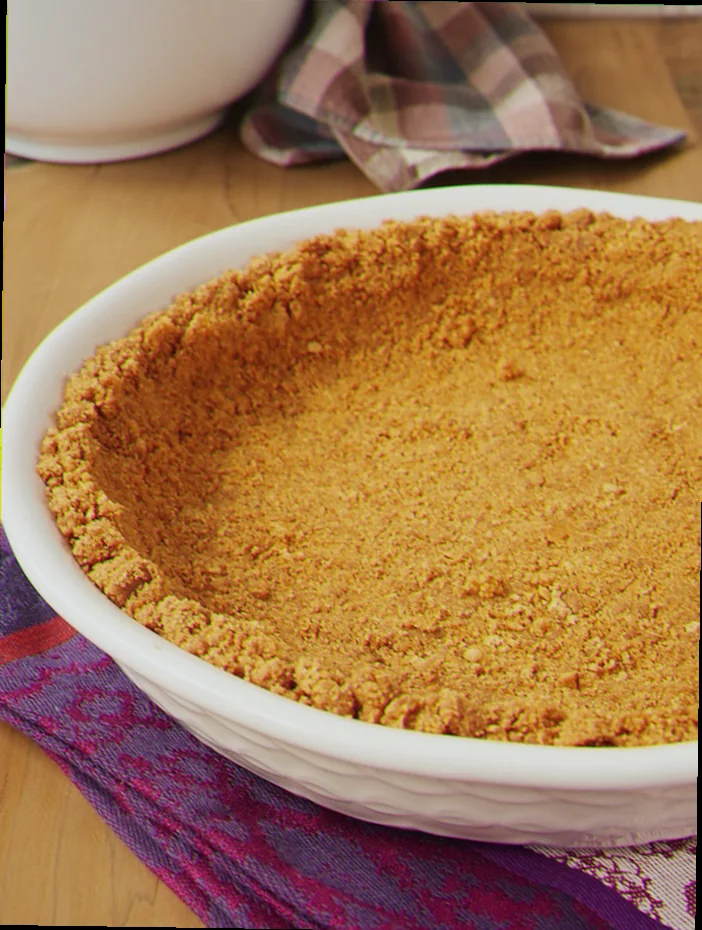
The Geometric Press: I dump the crumbs into the center of a 23cm pie plate. I don’t touch the sides yet. I take my straight-sided measuring cup and press the bottom first, working from the center outward. I use a lot of force—enough that my wrist feels the resistance. Once the bottom is a flat, even sheet about 5mm thick, I use the side of the cup to “wall” the crumbs against the edge of the pan. This creates a sharp 90-degree angle where the floor meets the wall, which is the hallmark of a crust that won’t leak.
The Thermal Shock: I slide the pan into the freezer for 20 minutes. While that happens, I preheat my oven to 175°C. I never skip the par-bake. Even for “no-bake” pies, a 10-minute bake is non-negotiable. It caramelizes the added sugar and the cookie fragments, acting as a “glue” that prevents the filling from soaking in.
The Cauterization: I bake the empty crust for exactly 10 minutes. I’m watching for the edges to turn one shade darker than the center. When it comes out, the smell is intense—like toasted nuts and caramel. I let it cool completely on a wire rack. If you pour a warm filling into a warm crust, you have just created a soggy disaster.
The Failures I Still See — and How to Fix Them
- The Slumping Wall: This happens when you haven’t pressed the crumbs hard enough against the sides or your butter-to-crumb ratio is too high. If it happens mid-bake, take a spoon and gently push the hot crumbs back up the wall immediately, then return to the oven for 2 minutes to “set” the repair.
- The Greasy Puddle: This is caused by using cheap butter with high water content or not browning the butter first. If the bottom looks wet, blot it very gently with a paper towel while it’s hot, then bake for 3 more minutes to dry it out.
- The Cement Texture: This is the result of over-processing the cookies into a fine powder. If you’ve already made the crumbs too fine, add an extra 10g of melted butter to help lubricate the density, but know that the texture will be “hard” rather than “crisp.”
When I Make This and What I Serve It With
This crust earns its place during my annual Summer Pie Night. It is the mandatory foundation for a classic Atlantic Beach Pie (lemon-lime with a saltine-cracker-style cookie base). The saltiness of the speculoos/brown butter crust demands something acidic and creamy to sit on top of it.
I also pair this crust with a dense, dark chocolate ganache tart. The crunch of the speculoos against the silk of the 70% cacao chocolate is world-class. To drink, I always serve a cold glass of tawny port or a very dry, acidic Espresso Martini. The bitterness of the coffee cuts through the buttery richness of the crust perfectly.
Substitutions I’ve Tested Honestly
- Graham Crackers → Pretzels: I tried 250g of crushed pretzels for a strawberry pie. Result: Incredible flavor, but you need an extra 20g of butter because pretzels are much drier than cookies. It’s a win if you want that salty-sweet hit.
- Butter → Coconut Oil: Tested for a vegan friend. Honest verdict: It “works” but the texture is waxy. It lacks the Maillard reaction of browned butter, so the crust tastes “flat.” Only use it if you absolutely have to, and add a drop of vanilla extract to mimic the richness.
- Gluten-Free Graham Crackers → Standard: I used GF crackers for a holiday party. They are actually better for crumb crusts because they tend to be grittier and more “sandy,” which leads to a phenomenal crunch. No adjustments needed.
Questions I Get Asked About Cookie Crumb Pie Crusts
Should I use a food processor or a rolling pin to crush the cookies?
Use the food processor. A rolling pin creates uneven chunks and “dust” at the same time, which leads to structural weak spots. The food processor gives you the uniform “cornmeal” texture that ensures the butter coats every single molecule. Pulse it; don’t just hold the button down.
Related topics: Marguerite preston pie crust recipe · Italian pie recipes · Pecan sour cream pie crust recipe
Can I skip the sugar if the cookies are already sweet?
You can, but you shouldn’t. The 40g of sugar isn’t just for flavor; it’s the mortar. When it melts in the oven and then cools, it hardens into a glass-like state that holds the crumbs together. If you skip it, you’re relying entirely on the butter, which is a liquid at room temperature.
My crust always sticks to the pan. How do I stop that?
Stop greasing the pan. There is enough fat in 85g of butter to act as a natural release agent. If you grease the pan, the crust will actually slide down the walls during the bake. If it’s sticking, it’s usually because the sugar in the crust has caramelized to the tin—let it sit at room temperature for 5 minutes to slightly soften the fats before slicing.