The most devastating failure of a lemon pie is the Fluid Filling Collapse, where a beautiful-looking slice dissolves into a yellow puddle the moment the knife exits the crust. This structural catastrophe, often paired with a Soggy Bottom crust, transforms a refined dessert into an unappetizing soup. This guide will diagnose every technical failure point—from weeping meringues to grainy fillings—to ensure your next pie achieves structural and textural perfection.
What Perfect Best Recipe Lemon Pie Actually Looks, Feels, and Tastes Like
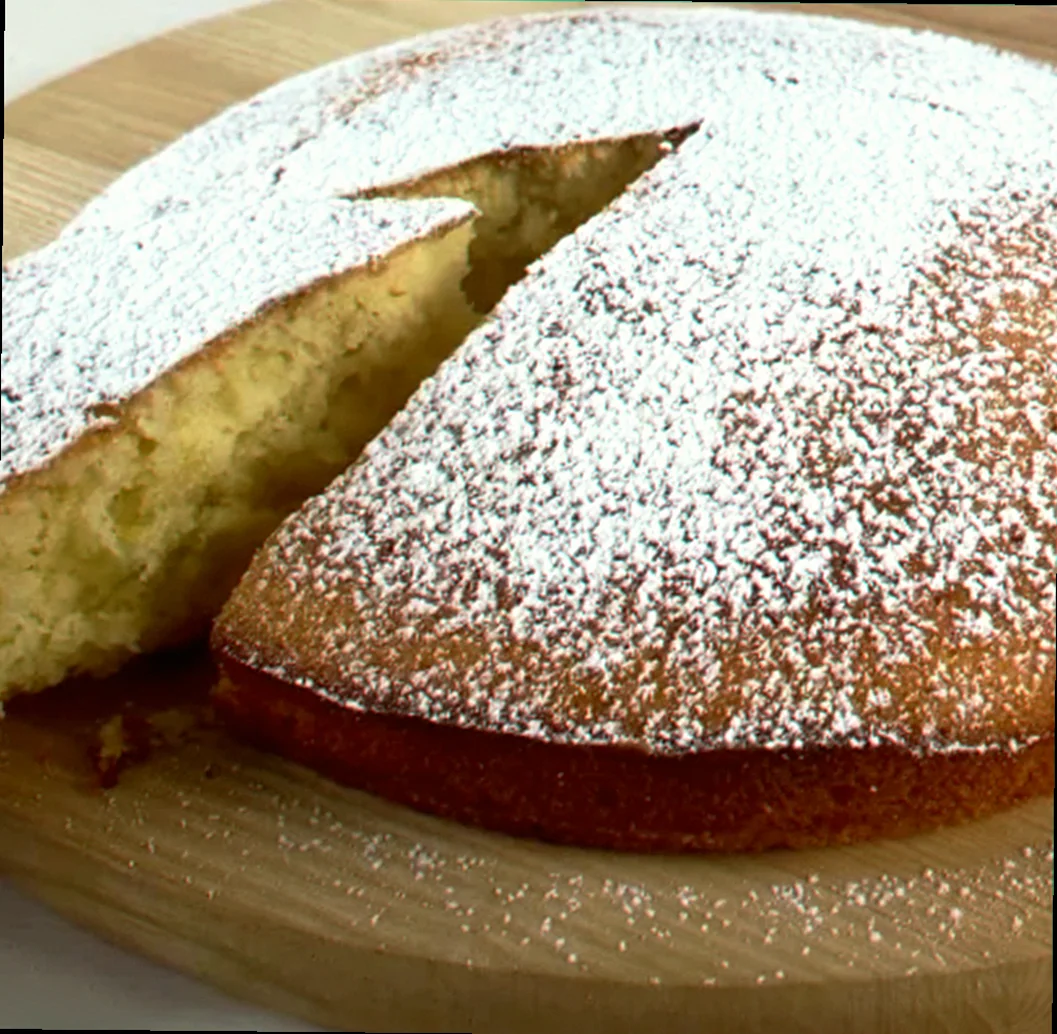
The benchmark for success is a pie that maintains a sharp, vertical edge when sliced, boasting a filling that is translucent rather than cloudy, and a meringue that clings to the edges without sliding or “sweating.”
| Stage | Success marker — what you should see / feel / smell / hear |
|---|---|
| The Raw Crust | Dough should feel like damp sand, holding its shape when squeezed but shattering if pressed too hard. It must be cold (4°C). |
| The Blind Bake | The crust should be pale gold, matte (no greasy sheen), and have a distinct “snap” when a small piece is broken off. |
| The Cooked Filling | At 79°C, the mixture transitions from opaque/milky to translucent and thickens to the consistency of heavy pudding. |
| The Meringue Peak | Whites should be glossy and stiff; when the whisk is lifted, the “beak” should stand straight up without drooping. |
| The Finished Slice | A clean cut with no liquid pooling at the base. The flavour sequence is: immediate citrus punch, followed by creamy egg yolk richness, finished by the marshmallow sweetness of the meringue. |
The Ingredient Failures — Wrong Choices Before You Even Start Cooking
- Filling Syneresis (Weeping): caused by using bottled lemon juice → fix: Use only fresh-squeezed lemons. Bottled juice has a standardized pH and preservatives that can interfere with the cornstarch’s ability to form a stable gel network.
- The “Eggy” Aftertaste: caused by using older, alkaline eggs → fix: Use Grade A large eggs, less than two weeks old. As eggs age, their sulfur content becomes more pronounced, which is amplified when heated with acidic lemon.
- Grainy Meringue Texture: caused by using standard granulated sugar in the whites → fix: Use Caster sugar (superfine). Large grains do not dissolve quickly enough in egg protein, leading to sugar crystals that melt in the oven and cause “beading” (syrup droplets on the surface).
The Technique Failures — What Goes Wrong During Cooking
- Starch Retrogradation (Thinning): The filling looks thick while hot but turns to liquid after cooling. → caused by amylase (an enzyme in egg yolks) attacking the starch. → fix: You must bring the lemon-starch-egg mixture to a full bubble for at least 30 seconds. This heat deactivates the amylase enzyme.
- Meringue Slippage: The entire meringue topping slides off the lemon base like a lid. → caused by applying meringue to a cold filling. → fix: The filling must be piping hot (at least 70°C) when the meringue is spread. This “cooks” the bottom of the meringue instantly, creating a structural bond.
- The Soggy Bottom: The crust is limp and greyish. → caused by under-baking or “moisture migration” from the filling. → fix: Blind bake the crust fully at 190°C until no pale spots remain, then brush with a thin layer of beaten egg white and bake for 2 more minutes to “waterproof” the pastry.
- Meringue Weeping (The Puddle Between Layers): A layer of water forms between the lemon and the foam. → caused by over-beating the egg whites before adding sugar. → fix: Start adding sugar as soon as the whites reach the “soft foam” stage. This stabilizes the protein bubbles before they become brittle and “pop,” releasing their water content.
The Equipment Failures — When Your Tools Are the Problem
- Plastic Mixing Bowls: These are the primary cause of Meringue Deflation. Plastic porous surfaces retain microscopic oil films that prevent egg proteins from bonding. Use stainless steel or glass only.
- Non-Insulated Pie Tins: Thin aluminum tins cause the edges of the crust to burn before the base is cooked. Use a heavy ceramic or tempered glass (Pyrex) dish for even heat distribution.
- Whisk Attachment vs. Paddle: Using a paddle attachment for meringue will result in a heavy, low-volume foam. Only use a balloon whisk to incorporate the air required for the “marshmallow” lift.
The Full Recipe — Built Around Preventing Every Failure Above
The Waterproofed Crust:
- Plain Flour — 250g — provides the gluten structure to prevent crumbling.
- Unsalted Butter (Chilled to 4°C) — 150g — cold fat creates steam pockets, preventing a tough, leaden crust.
- Iced Water — 30-50ml — added drop-by-drop to prevent over-hydration and gluten toughness.
The Structural Lemon Filling:
- Cornstarch (Maize Starch) — 40g — the primary thickening agent; prevents the “fluid collapse.”
- Caster Sugar — 200g — buffers the egg proteins to prevent curdling.
- Fresh Lemon Juice — 150ml — acidity levels are crucial for starch gelatinization.
- Egg Yolks — 4 Large — provides emulsification; prevents a “jelly-like” artificial texture.
- Boiling Water — 350ml — activates the starch instantly.
The Stabilized Meringue:
- Egg Whites — 4 Large (Room Temp) — room temp proteins stretch further for better volume.
- Caster Sugar — 200g — stabilizes the foam.
- Cream of Tartar — 1/4 tsp — lowers pH to prevent the protein strands from over-clumping and weeping.
Method:
- Rub butter into flour: Stop when it looks like breadcrumbs — prevents “greasy crust” — success marker: No lumps larger than a pea.
- Blind Bake: Use weights and bake at 190°C for 20 mins, then 10 mins without weights — prevents “Soggy Bottom” — success marker: Crust is uniformly biscuit-coloured.
- The Slurry: Mix cornstarch, sugar, and lemon juice before adding water — prevents “Starch Clumping” — success marker: A perfectly smooth, milky liquid.
- The Thicken: Whisk boiling water into the slurry in a saucepan. Cook until it bubbles — prevents “Runny Filling” — success marker: Mixture becomes translucent and heavy.
- Tempering: Add a spoonful of hot starch to the yolks before mixing them back in — prevents “Scrambled Egg Filling” — success marker: Smooth, glossy yellow cream.
- The Hot-Set: Pour the filling into the crust while it is still 75°C+ — prevents “Meringue Slide” — success marker: Steam is visibly rising from the pie.
- The Meringue: Beat whites with cream of tartar to soft peaks, then rain in sugar slowly — prevents “Grainy Meringue” — success marker: Peaks stand straight and look like shaving cream.
- The Seal: Spread meringue so it touches the crust edges — prevents “Meringue Shrinkage” — success marker: No lemon filling is visible around the perimeter.
How to Rescue Best Recipe Lemon Pie When It Has Already Gone Wrong
- If the filling won’t thicken in the pan: It likely hasn’t reached the 79°C threshold. Continue whisking over medium heat. If it’s boiling and still thin, mix 1 tbsp cornstarch with 1 tbsp cold water and whisk it in. Cook for 1 more minute.
- If the filling has curdled (small yellow lumps): This is overheated egg. Immediately remove from heat and rub the filling through a fine-mesh sieve into the crust. It won’t be as stable, but the texture will be saved.
- If the meringue starts “weeping” in the fridge: You cannot stop the process once it starts, but you can dab the droplets gently with a paper towel. For the next pie, ensure you are using the “hot filling” application method.
- If the crust has slumped down the sides of the tin: This means the fat was too warm. You cannot fix the shape, but you can “patch” any cracks with a little leftover raw dough and bake it for 5 minutes to seal it before adding filling.
Make-Ahead: Which Failures This Introduces and How to Avoid Them
Lemon Meringue Pie is notorious for failing during storage. The primary failure is Crust Softening and Meringue Liquefaction.
- The Cause: Sugar in the meringue is hygroscopic; it pulls moisture from the air and the filling.
- The Protocol: Never refrigerate a lemon pie uncovered. The humidity of the fridge will dissolve the meringue. Store in a cool, dry place for up to 4 hours. If you must refrigerate, use a “pie dome” or a large inverted bowl that doesn’t touch the meringue.
- Temperature: Serve at 15-18°C. If served straight from a 4°C fridge, the starch in the filling will feel rubbery rather than creamy.
Related topics: Best tasting apple pie filling recipe · Pasties pie recipe · Recipe to make apple pie crust
Diagnostic FAQ
My filling turned out cloudy and tastes like flour — what went wrong?
This is Under-Cooked Starch. The cornstarch didn’t reach its gelatinization temperature (approx. 75-80°C). You must cook the filling until it transitions from opaque to translucent and “pops” with a few large bubbles.
It looked perfect until I sliced it, then the meringue pulled away from the crust — why?
This is Meringue Shrinkage. As the protein in the egg whites cooks, it contracts. If the meringue wasn’t “anchored” by spreading it all the way to touch (and slightly overlap) the crust edges, it will pull inward toward the center as it cools.
Why is there a layer of syrup at the bottom of my pie plate?
This is Advanced Syneresis. Either the filling wasn’t boiled long enough to kill the amylase enzymes, or the pie was cooled too quickly (e.g., put in the freezer). Always let the pie cool at room temperature for at least 4 hours to allow the starch gel to stabilize slowly.