I spent three years getting Adeena Sussman’s pie crust recipe wrong before I understood that I was treating it like a chemistry project instead of a construction site. My early attempts were heartbreaking; I’d pull a pie from the oven only to find a tough, cracker-like shell that required a steak knife to saw through, or worse, a greasy puddle where the butter had simply surrendered. The revelation that changed everything—the single insight that moved my crusts from “fine” to “monumental”—was the Lamination Fold. Adeena’s genius isn’t just in the ratios; it’s in the physical act of folding the dough over itself like a letter, creating internal skyscrapers of butter that shatter into a thousand flakes when the heat hits them.
Why Most Versions of Adeena Sussman’s Pie Crust Fail
The “wrong way” most people try first is the Food Processor Trap. We’ve been lied to by decades of “quick and easy” cooking segments telling us to pulse the butter until it looks like “fine crumbs.” If your dough looks like sand, you have already lost. A food processor creates a homogenous paste that produces a shortbread-like texture—mealy, dense, and utterly devoid of those architectural layers. When people follow Adeena’s recipe but use a machine, they end up with a “cookie crust” that lacks the structural integrity to hold a juicy fruit filling. You want “shattered glass” flakes, not “sandy rubble.” To get there, you have to put the machine away and use your hands to keep the butter in distinct, thumb-sized chunks.
The Ingredients That Actually Matter
I don’t care what the French pastry books say; I use 225g of high-quality salted butter, and I don’t apologize for it. Most recipes demand unsalted butter so you can “control the salt,” but Adeena’s Israeli-inspired palate understands that salt is the soul of the crust. I’ve tried using fancy European cultured butters, but honestly, a standard high-fat salted butter from the grocery store produces the most consistent results. I cut those 225g of butter into 1-cm cubes and freeze them for at least fifteen minutes before I even touch the flour.
For the base, I use 315g of all-purpose flour—specifically a brand with moderate protein content. If you go too high-protein (like bread flour), the crust becomes bready; too low (like cake flour), and it won’t hold the weight of a heavy apple filling. To this, I add exactly 12g of granulated sugar, which isn’t there for sweetness but for the Maillard reaction—it’s the secret to that deep, mahogany brown color that looks so professional. Finally, I prep 120ml of ice-cold water, though I rarely use it all. I’ve learned the hard way that the “ice” in ice water isn’t a suggestion. If that water is even slightly room temperature, it will melt the butter mid-mix, and your flakiness will evaporate before it ever hits the oven.
The Moment Everything Changes: The Lamination Fold
This is the article’s centerpiece and the technique that defines success. Before I learned the Lamination Fold, my dough was just a clump of hydrated flour. Now, I treat the dough like a piece of stationery. After the water is incorporated and the dough is still a shaggy, terrifying mess, I dump it onto a floured surface and pat it into a rough rectangle. I fold the top third down and the bottom third up—just like an envelope. Then I turn it 90 degrees and do it again. This creates layers of butter trapped between sheets of flour. In the oven, the water in the butter turns to steam, pushing those layers apart. This is the science of the “lift.” Without this step, you’re just making a biscuit; with it, you’re making art.
How I Actually Make It Now — Step by Step
I start by clearing my mind and cooling my kitchen. If the room is over 24°C, I don’t even bother; the butter will win the battle of temperatures every time.
The Initial Integration: I whisk the 315g of flour and 12g of sugar in a wide metal bowl. I drop in the 225g of frozen salted butter cubes and use a pastry blender—or my cold fingertips—to press the butter into the flour. I am looking for “walnuts,” not “peas.” I want to see big, flat shards of butter coated in flour. If you see a uniform texture, you’ve gone too far.
The Hydration Dance: I drizzle in the ice water, 15ml at a time, tossing the flour with a fork like I’m mixing a salad. I stop when the dough just barely holds together when I squeeze a handful. It should still look dry in places. If it looks like play-dough, you’ve added too much water and developed too much gluten. I usually end up using about 80ml to 90ml of the 120ml I prepped.
The Envelope Fold: I dump the shaggy pile onto the counter. It will look like it’s failing. It will look like a pile of debris. Do not panic. I press it into a 2cm thick rectangle and perform my two envelope folds. Suddenly, the “debris” transforms into a cohesive, marbled sheet. This is the sensory cue: the dough should feel cool to the touch and look like a topographical map of butter-veins.
The Long Sleep: I wrap the dough tightly in plastic and refrigerate it for a minimum of two hours, but ideally overnight. If you rush this and try to roll it out immediately, the gluten will be “angry” and the crust will shrink in the oven like a cheap wool sweater. The rest allows the flour to fully hydrate and the butter to re-harden at 4°C.
The High-Heat Blast: When it’s time to bake, I set my oven to 205°C. I’ve found that starting at a high temperature is non-negotiable for Adeena’s crust. That initial blast of heat is what triggers the steam in the butter layers to puff up the dough before the structure sets. I bake until the edges are a deep, dark gold—much darker than you think is safe.
The Failures I Still See — and How to Fix Them
- The “Grey Sludge” Appearance: This happens when you overwork the dough with warm hands. The butter melts into the flour, turning it a dull grey rather than a bright, creamy white. The fix is immediate: if the dough feels tacky or looks grey, put the whole bowl in the freezer for ten minutes before continuing.
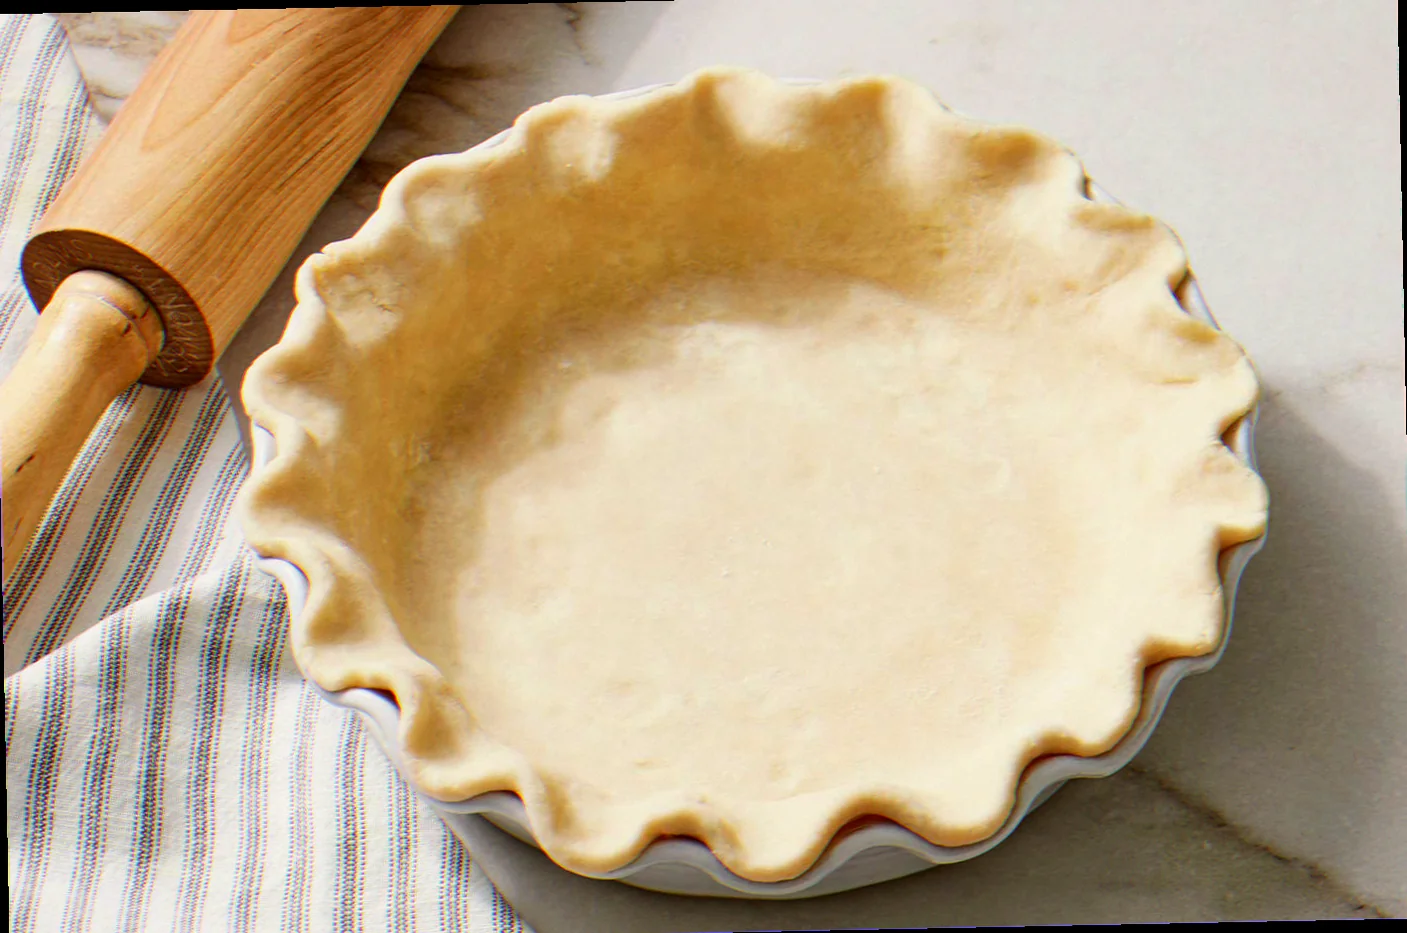
- The Shrinking Crust: If your crust pulls away from the edges of the tin and collapses into the center, you didn’t let the gluten rest or you stretched the dough while fitting it into the pan. Always “slump” the dough into the corners, never pull it.
- The Shattered Edge: This is the failure that still catches me out. If the dough cracks significantly while rolling, it’s too cold or too dry. I recover this by letting it sit on the counter for five minutes to take the chill off, then “patching” the cracks with a little bit of excess dough and a drop of water. It’s a crust, not a diamond; it’s allowed to have scars.
When I Make This and What I Serve It With
I make this crust every single Rosh Hashanah and for most Friday night Shabbat dinners when guests are coming. It’s a “statement” crust. It earns its place because it bridges the gap between a dessert and a savory element. I almost always fill it with Adeena’s signature flavors—think a tart plum and cardamom filling or a savory leek and feta galette.
On the table, it sits next to a slow-roasted brisket because the acidity of a fruit pie made with this crust cuts through the fat of the meat perfectly. For a drink pairing, I go with a dry, bubbly cider or a crisp Israeli Chardonnay. The carbonation or acidity in the drink cleanses the palate after the rich, buttery flake of the pastry.
Substitutions I’ve Tested Honestly
- Butter → Margarine: I tried this for a Pareve (dairy-free) version. The result was… acceptable, but the flavor was hollow. If you must go dairy-free, use a high-quality vegan butter stick that is oil-based, not water-based, or you’ll end up with a soggy mess.
- Salted Butter → Unsalted Butter + 1 tsp Salt: This is a fine substitute, but you must whisk the salt into the flour extremely well. Nothing ruins a pie like a literal pocket of salt in one bite and blandness in the next.
- All-Purpose Flour → Gluten-Free Blend: I tested this with a 1-to-1 ratio. It loses the “stretch” needed for the Lamination Fold, so I don’t bother folding it. It’s a “press-in” crust at that point. It’s okay, but it’s not the same soul.
Questions I Get Asked About Adeena’s Crust
Can I make the dough in advance and freeze it?
Yes, and you should. I’ve kept this dough in the freezer for up to two months. Just thaw it in the fridge for 24 hours before rolling. Never thaw it on the counter or the butter will go soft.
Related topics: Marguerite preston pie crust recipe · Pecan sour cream pie crust recipe · Recipe to make apple pie crust
Why is my bottom crust always soggy?
You aren’t baking it long enough or your oven floor isn’t hot enough. I bake my pies on the lowest rack on a preheated baking sheet (or a pizza stone). This ensures the bottom gets a direct hit of heat to sear the crust before the filling can soak in.
Do I really need to use a scale?
I used to say no, but I was wrong. If you measure 315g of flour with a cup, you might end up with 350g if you pack it down, leading to a dry, crumbly disaster. Buy a digital scale. It is the only way to guarantee that the “shaggy mess” actually turns into a pie.