The most common failure in replicating the 131 Main banana cream pie is The Structural Slump, where a seemingly firm pie dissolves into a puddle the moment it is sliced. This catastrophic loss of integrity occurs when the pastry cream fails to reach the precise temperature required for starch gelatinization or when the banana-to-cream ratio is improperly balanced. This diagnostic guide identifies every mechanical and chemical failure point to ensure your pie maintains a clean, architectural edge from the first slice to the last.
What Perfect 131 Main Banana Cream Pie Actually Looks, Feels, and Tastes Like
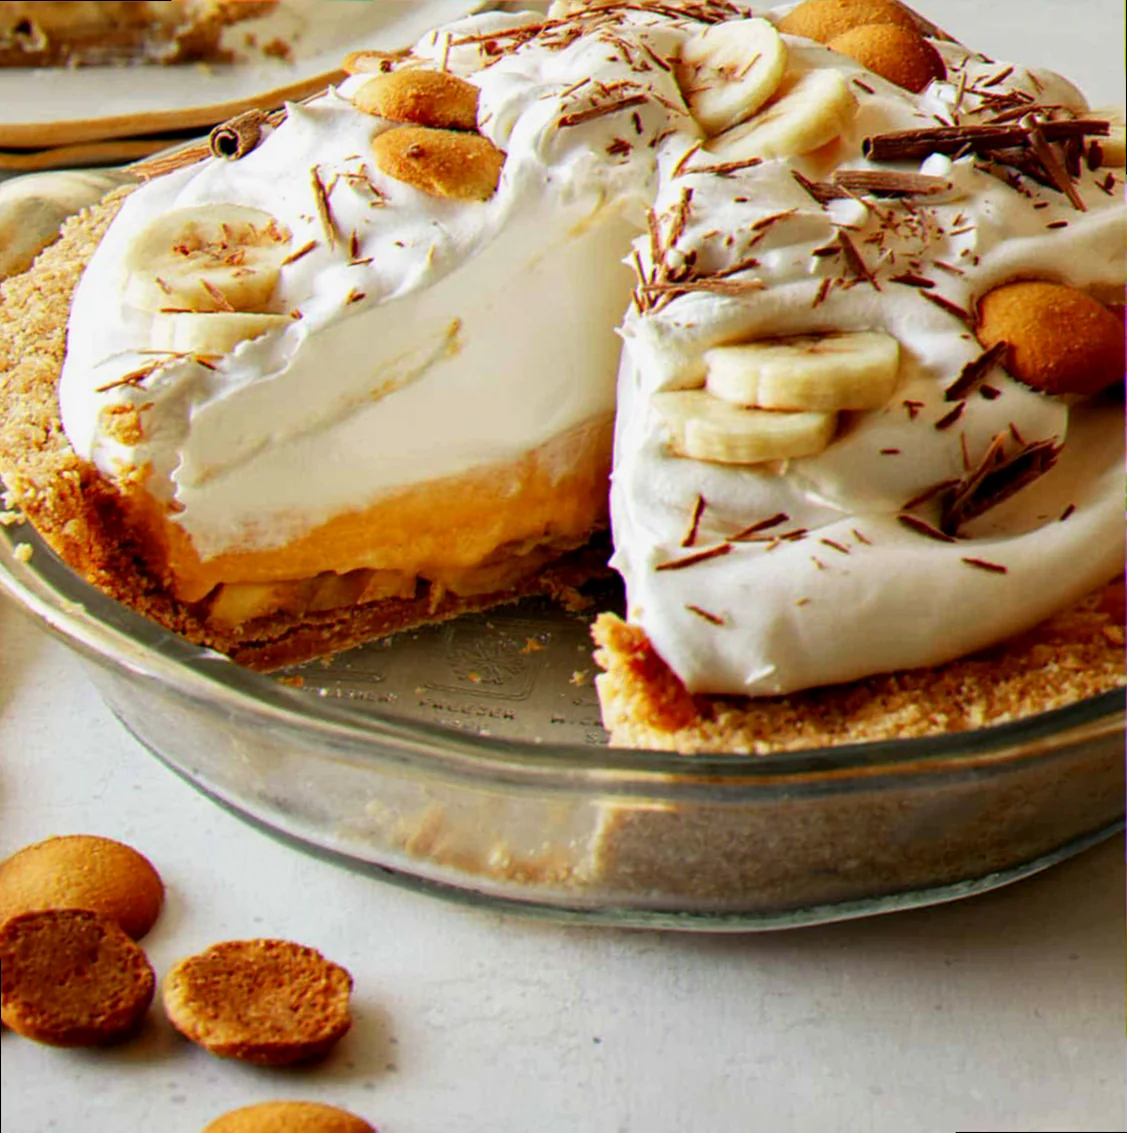
Before diagnosing a failure, you must recognize the benchmark of success. This pie is not a soft pudding; it is a dense, velvety custard with a structural snap.
| Stage | Success marker — what you should see / feel / smell / hear |
|---|---|
| The Crust (Post-Bake) | Deep golden-brown; smells like toasted butter; feels like a firm, compacted biscuit that does not crumble when pressed with a finger. |
| The Custard (Cook Stage) | A thick, glossy “ribbon” that holds its shape for 3 seconds when dropped from a whisk; internal temperature of 82°C to 85°C. |
| The Set (6 Hours Later) | A matte surface with no “weeping” liquid; the center should have a very slight, tight jiggle like a heavy panna cotta, not a wave. |
| The Final Slice | A clean vertical cut; the bananas are ivory (not grey); the flavor begins with cold vanilla bean, followed by buttery graham cracker, ending with a clean dairy finish. |
The Ingredient Failures — Wrong Choices Before You Even Start Cooking
- The “Watery Custard” Failure: caused by using low-fat milk or “half-and-half” substitutes → fix: use strictly Whole Milk (3.5% fat) and Heavy Cream (36%+ fat). Lower fat content prevents the milk proteins from creating the necessary network with the cornstarch.
- The “Grainy Mouthfeel” Failure: caused by using granulated sugar that is too coarse or cheap cornstarch with high moisture content → fix: use Extra-Fine Granulated Sugar and a fresh, airtight container of Pure Cornstarch.
- The “Mushy Fruit” Failure: caused by using overripe, “bread-making” bananas (black spots) → fix: use “Stage 5” Bananas—bright yellow with green tips. They must be firm enough to resist the knife slightly, providing a textural contrast to the cream.
- The “Bland Profile” Failure: caused by using imitation vanilla or old extract → fix: use Vanilla Bean Paste or a whole scraped Vanilla Bean. The visual “specks” are a 131 Main hallmark and indicate high-quality volatile oils.
The Technique Failures — What Goes Wrong During Cooking
- The Scrambled Egg Failure: what it looks like is tiny yellow curds throughout the cream → caused by Thermal Shock (dumping hot milk directly into cold yolks) → fix: Tempering. Slowly whisk 125ml of the hot milk into the egg/sugar mixture first to raise the temperature gradually before combining the two masses.
- The “Starch Reversion” Failure: symptom: the pie sets in the fridge but turns to liquid after 2 hours → cause: Amylase Enzyme Contamination. If even a tiny amount of your saliva (from a tasting spoon) touches the custard, the enzymes will eat the starch bonds → fix: never double-dip a tasting spoon; use a clean spoon for every check.
- The “Soggy Bottom” Failure: symptom: the crust is a wet paste rather than a crisp base → cause: Moisture Migration from the bananas and custard → fix: The Butter Barrier. Once the graham crust is baked and cooled, brush it with a thin layer of melted white chocolate or a very thin layer of tempered butter to seal the “pores” of the crust before filling.
- The “Oxidized Grey” Failure: symptom: bananas turn unappetizing grey/brown within an hour → cause: Polyphenol Oxidase (exposure to oxygen) → fix: The Lemon Acid Bath. Toss sliced bananas in 15ml of fresh lemon juice and immediately submerge them in the custard to block oxygen contact.
The Equipment Failures — When Your Tools Are the Problem
- Thin-Bottomed Saucepan: This causes Localised Scorching. The milk solids will burn at the bottom before the center reaches 82°C, leaving “black flecks” in the pie. Use a Heavy-Gauge Stainless Steel or Copper-Core pot.
- Plastic Whisk: Often too flexible to reach the “corners” of the pan, leading to lumps of un-hydrated starch. Use a Stainless Steel Balloon Whisk with stiff tines to ensure every milliliter of liquid is agitated.
- Inaccurate Thermometer: If your thermometer is off by 5 degrees, the cornstarch won’t hydrate. Use a Digital Instant-Read Thermometer (like a Thermapen) to verify the 82°C–85°C threshold.
The Full Recipe — Built Around Preventing Every Failure Above
- Graham Cracker Crumbs — 250g — ensure they are fine-ground to prevent “The Crumbly Break.”
- Unsalted Butter (Melted) — 115g — acts as the structural glue.
- Whole Milk — 500ml — provides the protein base for the custard.
- Heavy Cream — 250ml — adds the necessary fat for a “clean slice.”
- Egg Yolks — 6 Large (approx. 110g) — prevents “The Pale Pie” and provides emulsification.
- Cornstarch — 60g — the exact amount needed to prevent “The Structural Slump.”
- Vanilla Bean Paste — 15ml — prevents “The Bland Profile.”
- Bananas — 4 Large (Stage 5 ripeness) — prevents “The Mushy Fruit” failure.
Method:
- Compact the Base: Mix crumbs and butter. Press into the tin using the bottom of a flat measuring cup. Failure Prevented: “The Crumbly Crust.” Success marker: The surface should look like polished stone. Bake at 175°C for 10 minutes.
- The Starch Slurry: Whisk sugar, cornstarch, and egg yolks in a bowl until pale. Failure Prevented: “Lump Formation.” Success marker: The mixture should be smooth with no visible white starch streaks.
- The Scald: Heat milk and cream until it just begins to simmer (approx. 80°C). Failure Prevented: “Scorched Milk.” Success marker: Small bubbles (shivers) around the edges of the pan.
- The Temper (Critical Control Point): Slowly drizzle 1 cup of hot milk into the egg mixture while whisking constantly. Then, pour the egg mixture back into the pot. Failure Prevented: “Scrambled Egg Failure.” Success marker: A smooth, uniform liquid.
- The Gelatinization Boil: Whisking constantly, bring the mixture to a boil. Once it bubbles, cook for exactly 2 minutes while whisking vigorously. Failure Prevented: “The Structural Slump.” Success marker: The whisk leaves deep tracks in the cream, and the temperature reads 84°C.
- The Finishing Polish: Remove from heat and whisk in the vanilla and 30g of cold butter. Failure Prevented: “Dull Finish.” Success marker: A high-gloss, mirror-like sheen on the custard.
- The Assembly: Layer 1/3 of the custard, then a dense layer of lemon-tossed bananas, then the remaining custard. Failure Prevented: “The Void Failure” (air pockets that cause collapse). Success marker: No bananas should be visible from the side or top.
How to Rescue 131 Main Banana Cream Pie When It Has Already Gone Wrong
- If the custard is lumpy: Immediately force the hot mixture through a Fine-Mesh Sieve using a silicone spatula. This is a 100% recovery fix for texture, provided the eggs haven’t fully “scrambled.”
- If the custard won’t thicken: If you’ve reached 85°C and it’s still thin, you likely mismeasured the starch. You can rescue it by mixing 1 tbsp of cornstarch with 2 tbsp of cold milk (a slurry) and whisking it into the simmering custard for another 60 seconds.
- If the crust breaks during service: This is a catastrophic structural failure. The Rescue: Deconstruct the pie into a Banana Cream Trifle. Layer the broken crust pieces, the custard, and fresh whipped cream into glass bowls. It is no longer a pie, but the flavor profile is preserved.
Make-Ahead: Which Failures This Introduces and How to Avoid Them
The 131 Main pie is best after 6 hours but degrades after 24 hours.
- The “Skin” Failure: If left uncovered, the top of the custard will form a tough, leathery skin. Fix: Press plastic wrap directly onto the surface of the hot custard (contact-wrapped).
- The “Weeping” Failure: Whipped cream topping will release water (syneresis) if stored overnight. Fix: Use Stabilized Whipped Cream by adding 1/2 tsp of “Whip It” (stabilizer) or whisking 1 tbsp of instant vanilla pudding mix into the heavy cream before whipping.
- Temperature: Store at strictly 4°C. Any fluctuation toward room temperature will soften the butter in the crust, leading to a “Soggy Bottom.”
Related topics: Whipped cream for pumpkin pie recipe · Pecan sour cream pie crust recipe · Marguerite preston pie crust recipe
Diagnostic FAQ
My pie looked perfect but the crust was as hard as a rock — what went wrong?
You likely over-compacted the crumbs or used too much butter. When chilled, the butter acts like concrete. Next time, press the crumbs only until they stay put, not until they are crushed into a solid mass.
It tasted like flour or starch — where did I go wrong?
This is the “Under-Cooked Starch” Failure. Cornstarch must reach the boiling point to “burst” the starch granules and neutralize the floury taste. You likely stopped cooking once it got thick but before it actually reached 82°C.
Everything looked perfect until I sliced it — why did it slide apart?
This is “The Banana Slide.” If you have too many layers of bananas without enough custard “glue” between them, the fruit acts as a fault line. Ensure every banana slice is fully encased in pastry cream.